Monday, March 4, 2013

Mini Mondays: Mini Jello Poke Cakes

Jello poke cakes are the perfect light dessert for spring and summer.  These little bundt cakes are even lighter because they are made with just cake mix and a can of sprite zero.  This is a tried and true Weight Watchers recipe where you take a box of cake mix and mix it with a can of diet soda (whatever kind you want).  Generally if you're making a darker cake (like chocolate) you want to use a darker diet soda (like diet coke).  I was skeptical about this at first because it sounds pretty crazy, but it totally works.  These little cakes have a slightly gummier texture than if you made them the traditional way (with eggs and oil), and if you're making these as cupcakes or a cake (as opposed to the mini bundt cakes) you'll want to cook them for 2-3 minutes longer than what it says on the box.  

The best part about these cute little cakes?  They clock in at just 2 Weight Watchers points plus!  Of course, that doesn't mean you can eat the entire batch, but you can feel less guilty about indulging in 1 or 2 when you're craving something sweet.

Mini Jello Poke Cakes


What you need:
1 box cake mix (I used white)
1 can Sprite Zero (or another diet lemon lime soda)
1 package jello (I used strawberry)
1 cup boiling water
1/2 cup cold water
Fat free cool whip


What you do:

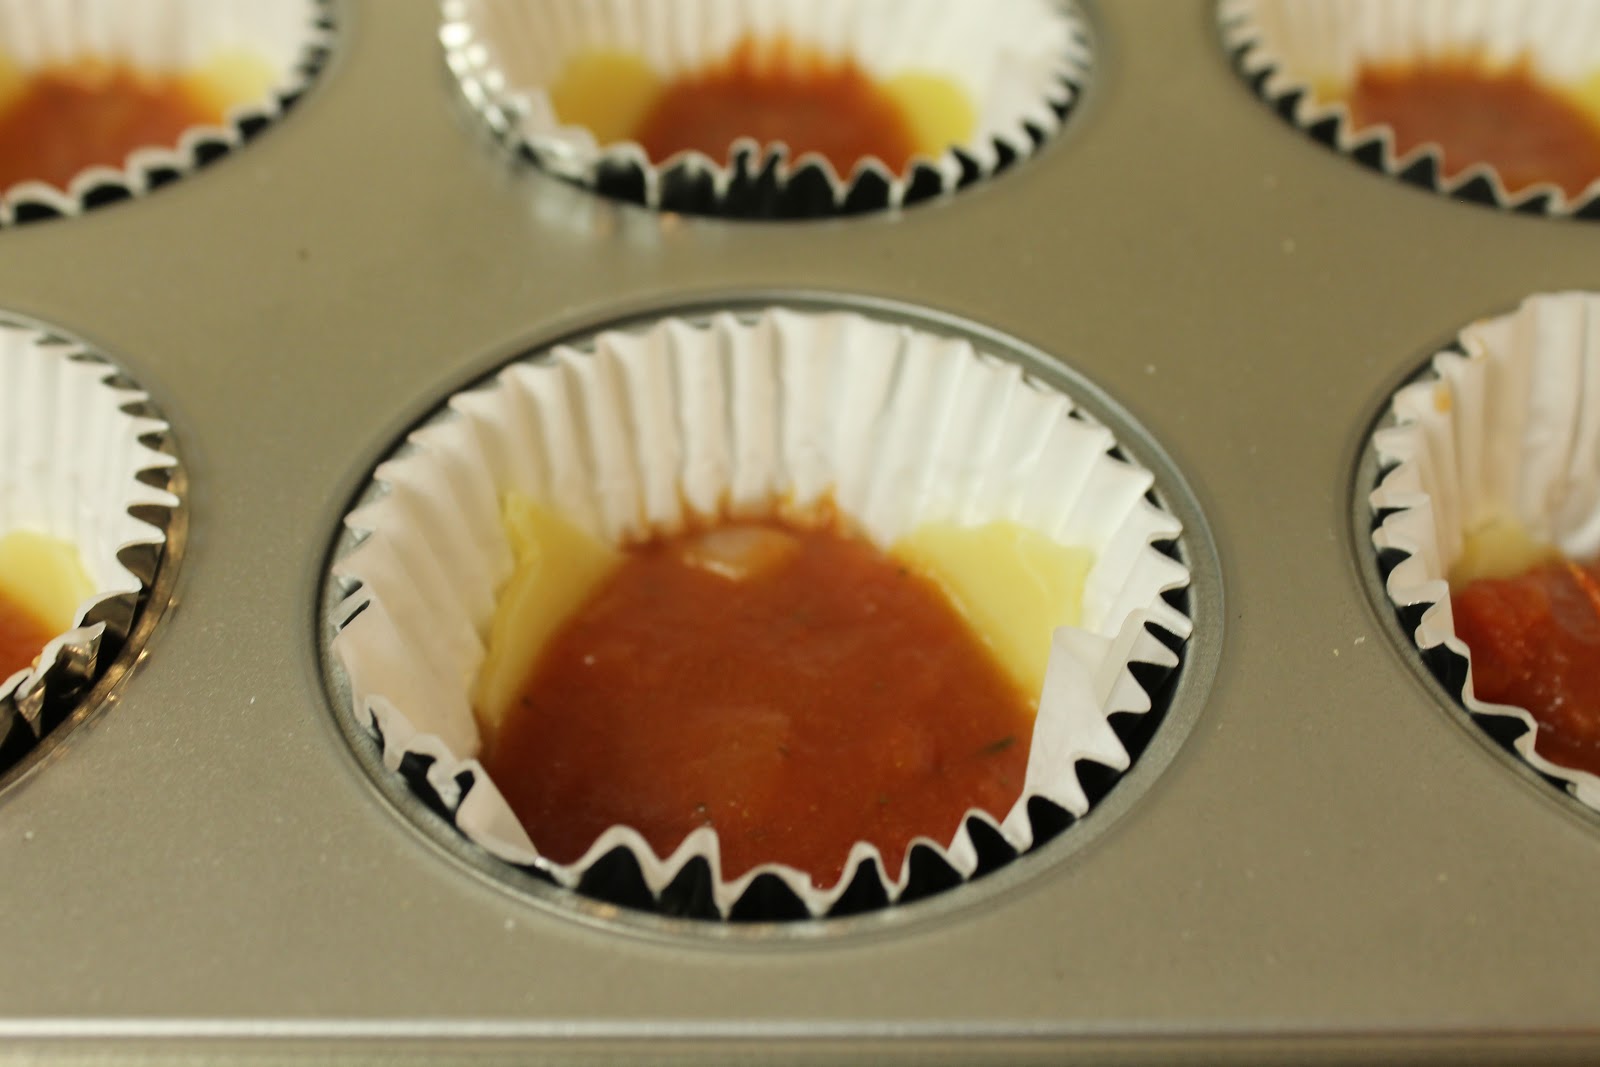
Preheat the oven to 350*.  Mix the cake mix with the can of Sprite Zero.  If you're making mini bundt cakes you'll bake them for 18 minutes.  If you're making cupcakes or a regular cake add 3 minutes to the recommended cooking time on the cake mix box.  Let them cook completely once you take them out of the oven.  Once they're cook make the jello.  Add the package of jello the boiling water and whisk until the jello is dissolved, then whisk in the cold water.  

Take a bamboo skewer or a fork to poke several holes into the flat side of each mini bundt cake (if you're making cupcakes or a cake just poke holes on the top).  Then spoon some jello over each cake.  Refrigerate the cake for several hours.  Top each mini cake with one tablespoon of fat free Cool Whip.  


I took these to a little dinner party and no one could tell that they were "diet" cakes and neither could Cole or my brother.  I call that a success in my book.  I have a feeling these will be making many more appearances in my kitchen this year.  


Monday, February 4, 2013

Mini Monday: A Mini Valentine's Day

I don't know about you, but I think there's something so romantic about sharing dessert with someone you love.  And, for some reason sharing an Italian dessert is extra romantic.  Maybe because Italian is the language of love.  Maybe it's because you can pretend you're in Venice on a moonlit gondola ride.  Either way, Valentine's Day is the perfect time to make a delicious dessert that's just big enough to share with the one you love.  Plus, if you stay at home and make it yourself you don't have to deal with all the crowds at the fancy restaurants.  And if you feel like getting a little "romantic", well you're in the privacy of your own home.  Go right ahead.

If all of that sounds good to you, then you're going to love this recipe for tiramisu.  This recipe is for a full 9x11 pan of tiramisu, but for Valentine's Day making it into a heart shape big enough for two to share takes a delicious dessert and "kicks it up another notch," to borrow a phrase from Emeril.  

 Valentine's Day Tiramisu
(adapted from Jessica Lynn Writes)


What you need:
1 1/4 cup strongly brewed coffee (room temperature)
5 T Kahlua
Lady fingers (about 30)
3 egg yolks
1/3 cup sugar
1/8 tsp salt
1/2 T vanilla
16 oz marscapone
6 T cold heavy (whipping) cream
Cocoa
Cinnamon


What you do:

Mix coffee and 3 T Kahlua in a shallow bowl and set aside.  

In a large bowl, beat egg yolks at a low speed until just combined.  Add sugar and salt and beat at medium-high speed until it becomes pale yellow.  Next mix in the remaining 2 T Kahlua along with the vanilla.  Then add about two-thirds of the marscapone and mix until well combined and there are no lumps.  

Now, this is wear my version of the recipe differs.  The original recipe calls for raw eggs.  If I bought high-quality farm fresh eggs, I'd probably be fine with keeping the eggs raw but I buy my eggs from Walmart.  I'd rather be safe than sorry.  If you're fine with using raw eggs go ahead and feel free to skip this next step.  Anyway, transfer the egg and marscapone mixture to a glass bowl and cook over a double boiler.  Make sure you whisk the mixture the entire time, we're not trying to make scrambled eggs here.  The objective is to heat the mixture up enough to get the "rawness" off the eggs.  You'll know it's done with the mixture kind of "breaks" and thins out.  Once that happens, remove it from the heat and put it in the fridge to let it cool.  Once it's cool transfer it back to the mixing bowl and mix in the rest of the marscapone.  Once it's mixed smooth, transfer it back to the glass bowl.

If you're keeping the eggs raw, join back up with me here.  Pour the cream in the mixing bowl (don't worry about cleaning it out), and mix on high until it will hold stiff peaks.  Gently fold about 1/3 of the whipped cream into the marscapone mixture using a rubber spatula.  Then fold in the rest until there are no white streaks in the mixture.  

And now it's time to assemble the tiramisu.  Take a heart shaped cookie cutter and place it on a plate.  Take lady fingers one at the time and drop them in the coffee/kahlua mixture, quickly flip them over then remove from the coffee.  This whole process should take 2-3 seconds.  You don't want them soaked, just damped.  Place lady fingers in the cookie cutter in one layer, breaking up the lady fingers as necessary.  Next put a big scoop of the marscapone mixture on top of the lady fingers and spread it out.  Next sprinkle some cinnamon on top of the marscapone mixture, and then sift a layer of cocoa on top of that.  Put down another layer of lady fingers, then carefully remove the cookie cutter.  Next, put another layer of marscapone.  Top with some more cinnamon and a thick dusting of cocoa (enough to cover the whole top of the heart).  Cover and refrigerate for at least 6 hours.

If you want to make a pan of tiramisu, you basically do the same exact thing as above, except you lay the lady fingers in a layer on the bottom of the pan and build up from there.

Happy Valentine's Day


Monday, January 7, 2013

Mini Mondays: Mini Peach and Blackberry Cobbler

When I was growing up we had a few blackberry bushes in our backyard that produced the biggest, most delicious blackberries I've ever had.  We would have fresh blackberries all summer, and then we'd have enough to freeze and enjoy them for the rest of year until summer rolled around again.  The first summer we had the blackberry bushes my mom made what has become one of my favorite desserts; blackberry cobbler.  Her cobbler is actually more of a crisp (oatmeal, flour, brown sugar and butter topping) although I didn't find this out until I was in college and I took a food and culture class for the honors program.  For part of the class we had to split up into groups and each group cooked dinner for the entire class one night and we all got comment cards to "critique" the food.  When it was my group's turn to make dinner I made my mom's blackberry cobbler.  When I got the comments back from the professor there were a lot of "This is good, but it's not a cobbler."  Well.... okay, sue me.  That's what we call cobbler in my family. We're not from the south; cobbler is a fruit dessert with a sweet topping.  

Oh well, lesson learned.  I still love my mom's "cobbler" and that's my go to summer dessert.  But that's not what we're here to talk about today (but don't worry, we will talk about it one day).  This is recipe is for "real" cobbler.  These are perfectly portioned in single servings but good luck trying to stop at one.  You could make this with any kind of fruit you want.  I made some with blackberries, some with peaches and then I went a little crazy and made some with both because I think peaches and blackberries go together like peas and carrots.  

Mini Peach and Blackberry Cobbler


What you need:
1 cup sugar
1 cup flour
2 tsp baking powder
Dash of salt
3/4 cup milk
1 tsp vanilla
Brown sugar
Cinnamon
1/2 stick melted butter
Diced peaches
Blackberries (fresh or frozen, just make sure they're thawed)

What you do:


Sprinkle some cinnamon over the fruit and set aside and preheat your oven to 350*.  Meanwhile mix together the sugar, flour, baking powder, salt and milk.  Add in the vanilla and about 1 tsp of cinnamon.


Put one teaspoon of melted butter in the bottom of each muffin tin.  I made half with muffin liners and half without and they both turned out great.  If you need to transport these somewhere I would definitely suggest using the muffin liners though.  Then spoon in two tablespoons of the batter on top of the melted butter. 


Next, put some fruit in top of the batter.  I put 4-5 diced peaches or 3-4 blackberries in each tin.


Sprinkle some brown sugar and cinnamon on top of the fruit.  Bake for 20 minutes.  


Let the cobbler that isn't in the muffin liners cool almost completely in the pan before removing them.  Before you take them out run a knife along the edge to loose them then use a spoon to help lift them out of the pan. 


Of course, a cobbler isn't really a cobbler without a scoop of vanilla ice cream on top to go with it. 


I think you're technically supposed to serve cobbler with the fruit on the bottom, but I think it looked so much prettier with the fruit on the top so you could really see the colors. 


Sunday, December 30, 2012

Cheesy Broccoli Orzo

I'm usually not very creative when it comes to side dishes.  Typically I'll throw a quick salad together or heat up some green beans and call it good.  That gets boring day after day, let me tell you.  This cheesy broccoli orzo was a nice change of pace from my typical side dishes, and one that I will definitely be making more often.

Cheesy Broccoli Orzo


What you need:
1 cup orzo
1 head broccoli, chopped
1/2 cup shredded cheddar cheese
1/2 cup milk
Salt and pepper to taste

What you do:
Add orzo to large pot of boiling water.  After a few minutes add the chopped broccoli in with the orzo. Cook until the broccoli and orzo is tender.  Drain well and return the broccoli/orzo to the pot.  Mix in the cheese and milk and stir to combine.  Season with salt and pepper to taste.  I didn't add any salt because the cheese made it plenty salty, but I added a bit of pepper.  At this point you could also add 1-2 tablespoons of butter to make it taste a little more rich but it's definitely not necessary.

This was so good, and even easier than throwing together a salad!  This will be making an appearance in my regular side dish rotation.  Next time I might add in some toasted pine nuts for some added texture.  You could also make this with rice, or any other shape pasta that you have on hand and it would be just as delicious.  If you make it with rice I would cook the broccoli separately and mix it together after they are both cooked.

I served this for dinner with salmon and brussels sprouts, and then I ate the leftovers for lunch for the next few days.  Delicious!


Sunday, December 16, 2012

Reindeer Cake Pops

A few weeks ago, I made some cake balls for a coworkers birthday.  I actually made them by accident; I was planning on making an oreo bundt cake but I got impatient and tried to take the cake out of the pan too early and it fell apart.  Instead of scrapping the whole thing I decided I'd just make cake balls because I happened to have some chocolate almond bark in the freezer from a chocolate covered strawberries project a long time ago.  The girls at work became, in a word, obsessed with them.  So when we decided to do a little cookie exchange at work for the holidays they demanded requested the oreo cake balls again.  Not one to disappoint, I obliged them but changed it up a little bit.  I mean, it was a holiday cookie exchange, I had to make them festive.  Right?  So, I decided to decorate them like reindeer.  I personally think they are adorable and I hope you agree.

Reindeer Cake Pops

'
What you need:
1 box cake mix (I used yellow cake mix)
Oil, water, eggs (whatever the cake mix calls for)
Oreos (I used about 1 row of the double stuffed oreos, chopped)
1 package pudding mix
2/3rds can icing (I used cream cheese)
Chocolate candy melts
Lollipop sticks
Candy eyes
Mini Pretzels
M&Ms 
Edible ink pen

What you do:

Bake your cake according to the instructions on the back of the box, but ad the pudding and oreos to the mix.  Make sure to chop the oreos up pretty finely because you are going to want a smooth ball for the cake pop.  Once the cake has baked and cooled (you can put it in the fridge to expedite the process) place it in a bowl and use your hands to crumble it up.  Make sure that it's crumbled up very finely.  Next, mix in the icing using your hands.  Yep, it's time to get messy, y'all.  You really only need 2/3rds of the can of icing or else it will get too mushy.  You want the consistency to still look kind of crumbly, but you should be able to roll it into a smooth ball and have it stay together.


To form the balls I first scoop out the "dough" using a cookie scoop.  That ensure that they are all the same size, and that they aren't too big or small for the lollipop sticks.


After you scoop out the dough you'll want to roll them into balls.  Make sure you wash your hands occasionally or else they will get super sticky and you won't be able to make the balls as smooth as they should be.  They need to be smooth so you can get a nice even layer of chocolate coating.

After you've rolled the cake balls pop in the freezer for about 20 minutes and melt a little bit of the candy melts.  Pull the balls out the freezer.  Dip the end of a lollipop stick in the melted chocolate and insert it in the cake ball, about halfway through.  This will kind of seal the lollipop stick to the cake ball.  Once each cake ball has a lollipop stick in it, put them back in the freezer for another 20 minutes or so and melt the rest of the candy melts.  I like to melt mine in a cup because that makes it easier to just dip the cake pop into the chocolate and have it be completely covered.  If you use a shallow bowl you have to worry about twisting it and then it makes it more likely that you're cake ball will fall off the lollipop stick and then you're going to get really annoyed.  Believe me, I am saving you A LOT of frustration.

Pull the cake pops out of the freezer and let them sit for a few minutes to kind of take the chill off.  If you don't do this the candy coating will crack when you go to the put the little reindeer antlers in.  In the meantime, you can break the pretzels in half.  

Okay, now we're ready for the fun part.  You'll want to dip the cake pops into the chocolate coating, and let the excess chocolate drip off when you pull it out.  Working quickly before the coating hardens,  insert the antlers in to the top of pop.  Set them aside to fully dry in a styrofoam block or a cup.  To attach the eyes and nose just dab a tiny bit of the chocolate to the back of each and press them in place.  Use an edible ink pen to draw the mouth.  I bought a cheapo set at WalMart and I would highly recommend using another brand because mine did not draw very well on these.  But, they still worked out okay.

To finish them off, I placed them in a little clear treat bag and tied it off with some red ribbon.


These are probably some of my favorite things I have ever made.  They may be a little time intensive but I really think the end results are worth it.  In fact, I think I'll be making these for Christmas Eve with Cole's family.  


Sunday, December 2, 2012

Seared Sea Scallops With Creamy Risotto: Part Deux

The very first recipe I posted on this blog was creamy risotto with pan-seared scallops.  I was really happy with the risotto but I thought the scallops could use some work, so I decided to try it again.  And I'm happy to say that these scallops turned out 100% better than the last ones.  The trick to making these is starting with a really hot pan, so hot that it's slightly smoking.  Also, do yourself a favor and use sea scallops.  The first time I made this I used bay scallops (the really small scallops), but this time I used sea scallops and they were so much better.  

Seared Sea Scallops with Creamy Risotto


What you need:
Sea scallops
Salt
Pepper
2 T butter
1 cup Arborio rice
1/2 cup white wine
3 cups (approx.) chicken stock
2 shallots, finely diced
7-8 cloves garlic, minced
Olive oil
1/2 cup parmesan cheese


What you do:
Warm the chicken stock in pot, and let it sit on low heat.  Heat a little olive oil in a pot or deep pan.  Saute the garlic and shallots until the shallots for a few minutes, then add in the rice and allow it to toast a bit.  Pour in the wine and stir until it has been fully absorbed by the rice.  Add about one ladle full of the chicken stock to the rice and stir until full absorbed by the rice.  Continue adding chicken stock to the rice and stir until the rice is creamy and tender.  Once it's done, remove from heat and stir in the parmesan cheese and season with a little salt and pepper.

Meanwhile, heat the butter and a little bit of olive oil in the bottom of a large saucepan.  Season the scallops with a little salt and pepper.  Let the pan get really hot and once it starts slightly smoking, put the scallops in flat side down.  Now whatever you do, do NOT move the scallops.  If you want them to have a nice sear you have to put them in the pan and leave them alone.  Let them cook for a few minutes.  You can look at the sides of scallops to see how much they are cooked.  They will turn from translucent to white as they cook.  Once they are about two-thirds of the way cooked they should have a pretty good sear on them and you can turn them over and let them cook the rest of the way.  You can take them off the heat when they are still a tiny bit translucent because they will continue to cook as they sit and you definitely don't want overcooked scallops.  

Serve the scallops over the risotto and spoon some of the butter from the saucepan on top of the scallops.  


Mini Mondays: Lasagna Cups

This month, for Mini Mondays I wanted to make something that would be easy to take to all those holiday parties you know you'll be going to (or having) in the next month.  These little lasagna cups are simple to make, and would be a great appetizer or a tasty addition to an hors d'oeuvre party.  You can make these in the foil muffin liners or directly in the muffin tin itself, they will stay together surprisingly well.  If you're making these for a party I'd suggest making them in the muffin liner because they're easier to serve and eat without a table that way. Plus, it makes for easier clean up.  This recipe will make enough for 12 lasagna cups. 

Lasagna Cups


What you need:
6 Lasagna noodles
8 oz ricotta cheese
Mozzarella cheese (finely shredded)
Parmesan cheese
Marinara sauce
Pepperoni
Basil (fresh or the Gourmet Gardens Basil Paste found in the produce section at the grocery store)

What you do:


Cook the pasta to al dente.  Drain them and allow them to cool a bit until you can comfortably handle them.  Use whatever small shaped cookie cutter you have to cut the noodles (or cut them into squares small enough to fit in the muffin tin).  I couldn't find my little circle cookie cutter so I used a little heart one and it worked perfectly.  With this size cookie cutter I was able to get 4 hearts out of each noodle.  Put one noddle at the bottom of each tin.  


Put a little spoonful of marinara sauce on top of each noodle.  


Next put a couple slices of pepperoni.  


Mix some basil in with the ricotta cheese.  Put a small spoonful on top of the pepperoni and a little sprinkle of mozzarella cheese.


Next comes another layer of pasta.


And another layer of marinara.


And some more ricotta.  


Now add some more mozzarella.  Put quite a bit because this is the top layer.  Top it off with a little bit of parmesan.  


Bake at 350* for 30 minutes, until the cheese is nice and melty.


Looks good, right?