Sunday, December 30, 2012

Cheesy Broccoli Orzo

I'm usually not very creative when it comes to side dishes.  Typically I'll throw a quick salad together or heat up some green beans and call it good.  That gets boring day after day, let me tell you.  This cheesy broccoli orzo was a nice change of pace from my typical side dishes, and one that I will definitely be making more often.

Cheesy Broccoli Orzo


What you need:
1 cup orzo
1 head broccoli, chopped
1/2 cup shredded cheddar cheese
1/2 cup milk
Salt and pepper to taste

What you do:
Add orzo to large pot of boiling water.  After a few minutes add the chopped broccoli in with the orzo. Cook until the broccoli and orzo is tender.  Drain well and return the broccoli/orzo to the pot.  Mix in the cheese and milk and stir to combine.  Season with salt and pepper to taste.  I didn't add any salt because the cheese made it plenty salty, but I added a bit of pepper.  At this point you could also add 1-2 tablespoons of butter to make it taste a little more rich but it's definitely not necessary.

This was so good, and even easier than throwing together a salad!  This will be making an appearance in my regular side dish rotation.  Next time I might add in some toasted pine nuts for some added texture.  You could also make this with rice, or any other shape pasta that you have on hand and it would be just as delicious.  If you make it with rice I would cook the broccoli separately and mix it together after they are both cooked.

I served this for dinner with salmon and brussels sprouts, and then I ate the leftovers for lunch for the next few days.  Delicious!


Sunday, December 16, 2012

Reindeer Cake Pops

A few weeks ago, I made some cake balls for a coworkers birthday.  I actually made them by accident; I was planning on making an oreo bundt cake but I got impatient and tried to take the cake out of the pan too early and it fell apart.  Instead of scrapping the whole thing I decided I'd just make cake balls because I happened to have some chocolate almond bark in the freezer from a chocolate covered strawberries project a long time ago.  The girls at work became, in a word, obsessed with them.  So when we decided to do a little cookie exchange at work for the holidays they demanded requested the oreo cake balls again.  Not one to disappoint, I obliged them but changed it up a little bit.  I mean, it was a holiday cookie exchange, I had to make them festive.  Right?  So, I decided to decorate them like reindeer.  I personally think they are adorable and I hope you agree.

Reindeer Cake Pops

'
What you need:
1 box cake mix (I used yellow cake mix)
Oil, water, eggs (whatever the cake mix calls for)
Oreos (I used about 1 row of the double stuffed oreos, chopped)
1 package pudding mix
2/3rds can icing (I used cream cheese)
Chocolate candy melts
Lollipop sticks
Candy eyes
Mini Pretzels
M&Ms 
Edible ink pen

What you do:

Bake your cake according to the instructions on the back of the box, but ad the pudding and oreos to the mix.  Make sure to chop the oreos up pretty finely because you are going to want a smooth ball for the cake pop.  Once the cake has baked and cooled (you can put it in the fridge to expedite the process) place it in a bowl and use your hands to crumble it up.  Make sure that it's crumbled up very finely.  Next, mix in the icing using your hands.  Yep, it's time to get messy, y'all.  You really only need 2/3rds of the can of icing or else it will get too mushy.  You want the consistency to still look kind of crumbly, but you should be able to roll it into a smooth ball and have it stay together.


To form the balls I first scoop out the "dough" using a cookie scoop.  That ensure that they are all the same size, and that they aren't too big or small for the lollipop sticks.


After you scoop out the dough you'll want to roll them into balls.  Make sure you wash your hands occasionally or else they will get super sticky and you won't be able to make the balls as smooth as they should be.  They need to be smooth so you can get a nice even layer of chocolate coating.

After you've rolled the cake balls pop in the freezer for about 20 minutes and melt a little bit of the candy melts.  Pull the balls out the freezer.  Dip the end of a lollipop stick in the melted chocolate and insert it in the cake ball, about halfway through.  This will kind of seal the lollipop stick to the cake ball.  Once each cake ball has a lollipop stick in it, put them back in the freezer for another 20 minutes or so and melt the rest of the candy melts.  I like to melt mine in a cup because that makes it easier to just dip the cake pop into the chocolate and have it be completely covered.  If you use a shallow bowl you have to worry about twisting it and then it makes it more likely that you're cake ball will fall off the lollipop stick and then you're going to get really annoyed.  Believe me, I am saving you A LOT of frustration.

Pull the cake pops out of the freezer and let them sit for a few minutes to kind of take the chill off.  If you don't do this the candy coating will crack when you go to the put the little reindeer antlers in.  In the meantime, you can break the pretzels in half.  

Okay, now we're ready for the fun part.  You'll want to dip the cake pops into the chocolate coating, and let the excess chocolate drip off when you pull it out.  Working quickly before the coating hardens,  insert the antlers in to the top of pop.  Set them aside to fully dry in a styrofoam block or a cup.  To attach the eyes and nose just dab a tiny bit of the chocolate to the back of each and press them in place.  Use an edible ink pen to draw the mouth.  I bought a cheapo set at WalMart and I would highly recommend using another brand because mine did not draw very well on these.  But, they still worked out okay.

To finish them off, I placed them in a little clear treat bag and tied it off with some red ribbon.


These are probably some of my favorite things I have ever made.  They may be a little time intensive but I really think the end results are worth it.  In fact, I think I'll be making these for Christmas Eve with Cole's family.  


Sunday, December 2, 2012

Seared Sea Scallops With Creamy Risotto: Part Deux

The very first recipe I posted on this blog was creamy risotto with pan-seared scallops.  I was really happy with the risotto but I thought the scallops could use some work, so I decided to try it again.  And I'm happy to say that these scallops turned out 100% better than the last ones.  The trick to making these is starting with a really hot pan, so hot that it's slightly smoking.  Also, do yourself a favor and use sea scallops.  The first time I made this I used bay scallops (the really small scallops), but this time I used sea scallops and they were so much better.  

Seared Sea Scallops with Creamy Risotto


What you need:
Sea scallops
Salt
Pepper
2 T butter
1 cup Arborio rice
1/2 cup white wine
3 cups (approx.) chicken stock
2 shallots, finely diced
7-8 cloves garlic, minced
Olive oil
1/2 cup parmesan cheese


What you do:
Warm the chicken stock in pot, and let it sit on low heat.  Heat a little olive oil in a pot or deep pan.  Saute the garlic and shallots until the shallots for a few minutes, then add in the rice and allow it to toast a bit.  Pour in the wine and stir until it has been fully absorbed by the rice.  Add about one ladle full of the chicken stock to the rice and stir until full absorbed by the rice.  Continue adding chicken stock to the rice and stir until the rice is creamy and tender.  Once it's done, remove from heat and stir in the parmesan cheese and season with a little salt and pepper.

Meanwhile, heat the butter and a little bit of olive oil in the bottom of a large saucepan.  Season the scallops with a little salt and pepper.  Let the pan get really hot and once it starts slightly smoking, put the scallops in flat side down.  Now whatever you do, do NOT move the scallops.  If you want them to have a nice sear you have to put them in the pan and leave them alone.  Let them cook for a few minutes.  You can look at the sides of scallops to see how much they are cooked.  They will turn from translucent to white as they cook.  Once they are about two-thirds of the way cooked they should have a pretty good sear on them and you can turn them over and let them cook the rest of the way.  You can take them off the heat when they are still a tiny bit translucent because they will continue to cook as they sit and you definitely don't want overcooked scallops.  

Serve the scallops over the risotto and spoon some of the butter from the saucepan on top of the scallops.  


Mini Mondays: Lasagna Cups

This month, for Mini Mondays I wanted to make something that would be easy to take to all those holiday parties you know you'll be going to (or having) in the next month.  These little lasagna cups are simple to make, and would be a great appetizer or a tasty addition to an hors d'oeuvre party.  You can make these in the foil muffin liners or directly in the muffin tin itself, they will stay together surprisingly well.  If you're making these for a party I'd suggest making them in the muffin liner because they're easier to serve and eat without a table that way. Plus, it makes for easier clean up.  This recipe will make enough for 12 lasagna cups. 

Lasagna Cups


What you need:
6 Lasagna noodles
8 oz ricotta cheese
Mozzarella cheese (finely shredded)
Parmesan cheese
Marinara sauce
Pepperoni
Basil (fresh or the Gourmet Gardens Basil Paste found in the produce section at the grocery store)

What you do:


Cook the pasta to al dente.  Drain them and allow them to cool a bit until you can comfortably handle them.  Use whatever small shaped cookie cutter you have to cut the noodles (or cut them into squares small enough to fit in the muffin tin).  I couldn't find my little circle cookie cutter so I used a little heart one and it worked perfectly.  With this size cookie cutter I was able to get 4 hearts out of each noodle.  Put one noddle at the bottom of each tin.  


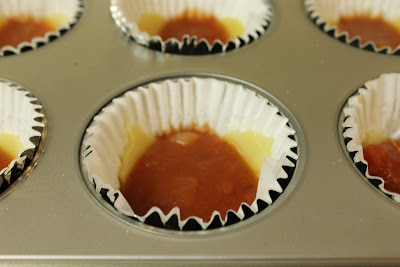
Put a little spoonful of marinara sauce on top of each noodle.  


Next put a couple slices of pepperoni.  


Mix some basil in with the ricotta cheese.  Put a small spoonful on top of the pepperoni and a little sprinkle of mozzarella cheese.


Next comes another layer of pasta.


And another layer of marinara.


And some more ricotta.  


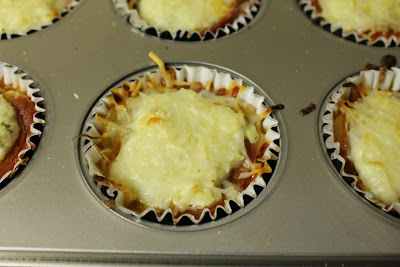
Now add some more mozzarella.  Put quite a bit because this is the top layer.  Top it off with a little bit of parmesan.  


Bake at 350* for 30 minutes, until the cheese is nice and melty.


Looks good, right? 


Sunday, November 25, 2012

Snickerdoodles

I made this cookies for my coworker's birthday and I loved them so much I made them again for Thanksgiving with Cole's family.  They are super soft and fluffy and are super cinnamon-y, just like a snickerdoodle should be!  I usually make snickerdoodles with box of yellow cake mix, but I decided to try out a new recipe this time and I was not disappointed. Just a note, this recipe makes about 18-20 cookies, so you'll need to double it if you're baking for more than a few people.

Snickerdoodles


What you need:
For the cookies:
1/2 cup softened butter
1/2 cup sugar
1/3 cup brown sugar
1 egg
1 tsp vanilla
1 1/2 cups flour
1/4 tsp salt
1/2 tsp baking soda
1/4 tsp cream of tartar
1/2-1 T cinnamon

For rolling:
2 T sugar
3 tsp cinnamon


What you do:

Cream together the butter, sugar and brown sugar.  Add the egg and vanilla and beat until smooth.  Combine the dry ingredients and add them slowly into the wet ingredients.  Set the dough in the refrigerator for 30 minutes to an hour.  

Once the dough has cooled, preheat the oven to 300*.  Combine the cinnamon and sugar in a small bowl.  Roll the dough into balls a little larger than the size of a walnut (about 2 1/2 T).  Roll the dough balls in the cinnamon sugar mixture.  Bake for 12-13 minutes.  Don't overbake these, they will probably seem undercooked when you remove them from the oven but they will continue to set once you take them out.  If you overbake them they won't be soft and chewy.  And if a snickerdoodle isn't soft and chewy what's really the point in eating them?  That's my philosophy at least.


Christmastime is definitely baking time, at least at my house and these will definitely be making an appearance in my annual Christmas Cookies goody bag I give out every year.  Maybe I'll even leave a few out for Santa on Christmas Eve... if I don't eat them all first. 

Thursday, November 8, 2012

Blogger Book Swap

We take a break for our usually scheduled food post to discuss something equally as exciting: books!  I was catching up on some of my favorite blogs and I saw that Fran was working with Jessica to host an awesome book swap.  Well, I love to read and I love getting things in the mail so I knew this was a swap for me.  I signed up and was paired with Jo from Loving Life in the Fab Lane.  I checked out her blog and Good Reads account and realized that we have very similar tastes in books so I was really excited to see what she sent me, and I was not disappointed!


I absolutely LOVE the Harry Potter series, and I have been wanting to read The Casual Vacancy since it came out.  I actually don't know anyone who has read this so I have no idea what to expect, but I can't wait to spend a few hours this weekend reading this! 

Monday, November 5, 2012

Mini Mondays: A Mini Thanksgiving

Thanksgiving is my absolute favorite holiday.  I could probably eat it once a month and never get tired of it.  My family's Thanksgiving is really special because my dad cooks the turkey on a charcoal grill so it doesn't taste like the typical oven roasted turkey (not that there's anything wrong with that).  The flavor that the turkey gets is so amazing, and it's always moist and delicious.  I have become very spoiled by my family's Thanksgiving.  So much so that the one and only year we ever had Thanksgiving at another family's house I was so disappointed and complained so much that the next weekend we had "real" Thanksgiving at our house.  Yes, I know... I'm spoiled.  I even had "Thanksgiving" dinner for my birthday this year.

Also, on our first date, Cole and I talked about Thanksgiving dinner for probably an hour.  The fact that  he asked me out after that is kind of a miracle, right?  I'm just glad I found someone who not only tolerates all of my weird quirks, but actually shares many of them with me.  I am one lucky girl.

So in honor of Thanksgiving, I decided to make a small version for this month's Mini Mondays.  This is something you could make any weekend of the year and get that little Thanksgiving fix.


Mini Thanksgiving


What you need:
Whole chicken
1 bag Pepperidge Farm Herb Seasoned Stuffing (I use the blue bag that has a mixture of white and wheat bread because that's what my mom always uses)
Chicken stock
1 bottle white zinfadel wine
1 yellow onion (diced)
5-6 cloves garlic finely chopped
5 stalks celery, cut into about 1/2 inch half circles
1 lb breakfast sausage
4 T butter
2 cans green beans
1 can cream of mushroom soup (I use reduced fat)
Milk
French's French Fried Onions
Potatoes
Cornstarch
Vegetable oil
Poultry seasoning
Thyme
Salt
Pepper

What you do:


Stuffing
Heat 2 T of butter in a large sauce pan.  Saute the garlic, onion and celery until they are soft.  Mix with the stuffing in a large bowl.  Cook the sausage and mix that in with the stuffing as well.  Add in about 3/4 cup of the wine and mix that in.  Then, add in enough chicken stock to make the mixture moist.  You'll use some of this to stuff the chicken, and the rest will cook in the oven in a glass baking dish, covered, at 350* for 30 minutes.

Mmm stuffing.  Although, apparently this is dressing because this wasn't stuffed into the chicken.  Whatever, I call it stuffing anyway and all these southern people I'm surrounded by can look at me weird.  

Roast chicken
Clean the chicken (remove the gizzards, wash off the inside and outside of the chicken and pat it dry).  Rub with a couple tablespoons of vegetable oil.  Season with salt, pepper and poultry seasoning.  Stuff the cavity with the stuffing/dressing.  Add wine into a large baking dish (enough so that there's 2-3 inches of wine in the bottom of the dish).  Add poultry seasoning and thyme to the wine (about 3 T poultry seasoning and 1 T thyme).  Just make sure that the wine is completely covered with a layer of seasoning.  Place a roasting rack in the baking dish and put the chicken on top.  Cook for 1 1/2 to 2 hours at 350*.  Cook uncovered for a nice crispy skin.

As a note, the chicken will take longer to cook than a regular roast chicken because it's stuffed.

Gravy
Take the drippings from the chicken (that are now mixed with the wine) and pour into a small saucepan.  Add about 1/2 cup chicken stock and cook over medium-high heat until it comes to a boil.  Mix 1 T cornstarch with about 1/2 cup milk and slowly whisk in to the gravy.  Continue to cook the gravy until it has thickened up.

Green Bean Casserole 

Mix the cream of mushroom soup and 3/4 cup milk in a baking dish.  Season with pepper.  Drain the green beans and mix with in with the soup, then stir in about 1/2 cup french fried onions.  Cook uncovered at 350* for 25 minutes, top with about 1/2 cup french fried onions and cook for another 5 minutes.

Mashed Potatoes


Peel and chop 4 medium sized potatoes.  Cover in water and cook over medium heat until the potatoes are soft.  Drain the potatoes and return to the pot.  Add 2 T butter and some milk and whip the potatoes with a handheld mixer.  Add a little amount of milk at first, then slowly add more until your potatoes are at the perfect fluffy consistency.  Season with a little bit of salt.


When I made this, as soon as I took the chicken out of the oven I put the stuffing and green bean casserole in.  The chicken needs to sit for at least 20 minutes before you cut into it anyway to let all the juices settle, otherwise you'll have a really dry chicken (and no one wants that).  I had the potatoes done (but not drained) and sitting on low heat so that I could quickly whip them up when the stuffing and green bean casserole had about 10 minutes left in the oven.  I also put the crescent rolls in the oven  when there was about 13 minutes left for the stuffing and casserole (because that's how long the rolls take to cook).

I will now be cooking my mini version of Thanksgiving dinner probably once a month.  My name is Jennifer, and I have a problem.  Do you think they have a Thanksgiving Addicts Anonymous support group?

Sunday, October 28, 2012

Bacon and Garlic Brussels Sprouts- You Won't Regret Making These

I'll be lucky if anyone is actually reading this post, because brussels sprouts have a bad reputation.  I tried them for the first time just a few weeks ago, and before that I was pretty afraid of them.  My mom never made us brussels sprouts growing up, and as far as I can remember the only time I ever encountered them was in the elementary school cafeteria where I though they resembled little alien brains.

So, I'm sure you're thinking "If you thought brussels sprouts resembled little alien brains, what in the world made you decide to try them?"  Well my friends, they are so cute and tiny and I figured that everything deserves to be tried once, so I bought a bag from the frozen vegetables aisle at the grocery store on a whim and decided I'd give them a shot.  And let me tell you, I'm glad I did.  Vegetables are all about how you prepare them.  I'm sure if you just steam some brussels sprouts and throw them on a plate, they aren't going to taste very good.  However, brussels sprouts are basically miniature heads of cabbage so they absorb flavor very well and it's really easy to add a ton and make these little tiny "alien brains" taste delicious.

Have I convinced you to give them a shot yet?

Brussels Sprouts  

What you need:
Brussels Sprouts (fresh or frozen)
4-5 slices bacon
1 shallot
3 cloves garlic

What you do:
Slice bacon into bite size pieces, chop the garlic and dice the shallot.  Cook the bacon in medium pan, add the shallots and garlic then the bacon is about halfway done.  Once you can begin to smell the garlic add the brussels sprouts.  Sautee the brussels sprouts until they are tender.  I cook the brussels sprouts whole, but in the future I will slice them in half length wise to let more flavor seep into sprouts.


Sunday, October 14, 2012

Chiles Rellenos

I may have said this before, but I do believe deep down inside I am a little tiny bit Mexican.  Nevermind that there's not a drop of anything but European blood in me.  That doesn't matter.  I love Mexican food, and I could eat it every single day and not get tired of it.  Lucky for me, I work with several people who were either born in Mexico, or whose parents were born in Mexico.  I'm always asking them for recipes and tips and tricks to make my dishes better.  This is one of those recipes, so you know that it's authentic and delicious.  It takes a little while to make so I don't think this will be a regular week night meal for us, but it's perfect for a lazy weekend dinner.  Besides, you can indulge yourself in margaritas on the weekends.  And believe me, you're going to want a margarita or three.  It's the weekend, no one's judging!

Chiles Rellenos with Habenera Sauce

What you need:

Chiles Rellenos
4 Anaheim peppers
Mozzarella cheese
2 eggs
Flour
Oil for frying
Thin cut sirloin steak
Onion (sliced)
Cumin
Steak seasoning
Salt and Pepper

Habanera Sauce
1 tomato
1 onion
3-4 cloves garlic
2 jalapeno peppers
2 habanero peppers
15 oz can tomato sauce
Salt (to taste)

What you do:


Place the tomato, onion (peeled and cut into quarters), peeled garlic cloves, habanero peppers, jalapeno peppers, and anaheims on a cookie sheet.  Broil them until they skin is nice and brown and kind of peeling away from the flesh.  I turn the peppers over once to make sure they get browned on both sides.


As soon as you take them out of the oven put the anaheim peppers into a large ziploc bag, close it and cover them with a warm towel.  You will let them sit for at least 10 minutes.  


In the meantime take your onion, tomato, garlic, jalapenos and habaneros and put them all in a blender along with the tomato sauce.  Blend until mostly smooth.  When you take the lid off the blender do not, I repeat DO NOT, stick your nose in their to smell it.  You will regret it immediately.  I am speaking from personal experience.  


This is what the sauce should look like.  It's pretty spicy, so if you like spicy food 2 habanero peppers is perfect.  If you don't like spicy food so much I would suggest 1 habanero and maybe adding more tomato sauce to mellow out the spiciness.  Put the sauce into a small pan and keep it on the stove over low heat (just enough to keep it warm).  


Now, take those anaheims out of the ziploc bag and peel the skin off.  It should come over really easy now that we've let them steam in the bag.  


After you've peeled them all, make a small slit down the middle and stuff them with the mozzarella.  Put enough cheese in there to fill up the body of the pepper, but not so much that you can't kind of pull one side of the pepper over the other so the cheese is mostly covered by the pepper.


Now, whisk the two eggs with a 1 or 2 tablespoons of water and season some flour with a little bit of salt and pepper.  Dip the stuffed peppers into the egg wash, then roll them in the flour.  Accept that fact that your hands will get incredibly messy now.    


While your oil is heating up to fry the chiles, cube up the steak and season with cumin, steak seasoning, salt and pepper.  Cook in a large frying pan with the sliced onion.  Now all you need to do is fry the peppers.  It will take several minutes on each side to make the chiles all nice and crispy and golden brown.


Serve with Mexican rice and refried beans.  I swear, one day soon I will show you the recipe for homemade refried beans. Seriously, the easiest thing you will ever make.  You'll never want to buy the canned stuff again.

Monday, October 8, 2012

Easy Breakfast Burritos

There is something about fall and winter that makes me crave breakfast.  For most of the year I'm not a huge breakfast fan.  I'll have some fruit or a quick smoothie, but I rarely wake up in the middle of July and say "Mmm... I really want a big breakfast this morning."  In the fall and winter though, when it's colder, I start craving a big traditional breakfast.  Eggs, bacon, sausage, pancakes, waffles.  It's all good to me.

Several weeks ago was the first day of the college football season.  And in case you didn't know, Cole probably loves college football even more than he loves me.  And if not, it's a very close second.  Don't believe me?  Go check out his college blog here and then come back.  Don't worry, I'll wait.

Okay welcome back.  Anyway, since we were up early to watch all 3 hours of College Gameday I thought I might as well make us breakfast.  I knew I needed to make something that Cole could eat with one hand so he could still write down all the picks, and I knew it needed to be delicious because, well, who wants to eat something that tastes like crap?  Not me.  So I decided on breakfast burritos.  The best part about this recipe?  It is delicious.  The second best part about this recipe?  It makes A TON and you can freeze them individually so you can grab one running out the door to work during the week.  Also, this recipe is more of a method.  You can put whatever you want in there.  For mine, I like to go heavy on the "extras" but that's because I don't like eggs too much.  Yes, I know that I'm weird.  I've accepted that.

Breakfast Burritos


What you need:
Eggs
Potatoes
Bacon
Sausage

What you do:
Cook the sausage, and set it aside in a large bowl.  Cook the bacon and cut it up into small/medium sized pieces and put in the bowl with the sausage.  Drain off most of the bacon grease, but leave just a little bit in there for the potatoes.  Cube up several potatoes, season with salt, pepper and garlic powder.  Cook the potatoes in the bacon grease until they are nice and soft and slightly crispy on the outside.  Add the potatoes to the bowl with the bacon and sausage and mix everything together.  Scramble the eggs.     


Then you just put some eggs in a big burrito style tortilla, add some of the filling, top with a little bit of salsa if you want, roll up the burrito and enjoy.   

Just as an example; for my burritos I used 9 eggs, 5 medium sized potatoes, 2/3 lb sausage and 2/3 package bacon and I made 10 burritos.  It should have made 12 but I made two really, really big ones at first on accident.


And like I said before, you can freeze the leftover burritos.  Just wrap them individually in saran wrap and put them all in a ziploc freezer bag.  You can pull them out and microwave them individually. 


Monday, October 1, 2012

Mini Mondays Fall Edition: Pumpkin Bread

Fall is my favorite time of year.  Cool weather, sweaters, boots, football, apples and pumpkin everything: pumpkin pasta, pumpkin candles, pumpkin bread, pumpkin spice lattes. I love it all.  

This is just for the lolz.  


The thought of fall is the only thing that gets me through the miserable summer months in Texas.  Even though in Texas fall really means 80 degree weather, which is still hot to really be fall, it's still better than 100 plus degrees every day so I'll take what I can get.  So in honor of the first Mini Monday of Fall, I present to you mini pumpkin muffins. 


Mini Pumpkin Muffins


What you need:

Pumpkin Muffins
2/3 cup canned pumpkin
1 egg
1/3 cup vegetable oil
1/4 cup water
1 cup sugar
1 1/4 cup flour
3/4 tsp baking soda
1/2 tsp salt
1/4 tsp cinnamon
1/4 tsp ground nutmeg
1/8 tsp ground cloves
1/8 tsp ground ginger
Mini bundt pan (If you don't have one you can use a muffin pan, they just won't look like little pumpkins when they're done.)
Caramel

Cream Cheese Glaze
4 oz cream cheese
2 T honey
2 T milk

What you do:


Mix together the wet ingredients: pumpkin, vegetable oil, water and sugar.  


Add in the dry ingredients and mix well.  Fill the mini bundt pans about 2/3 of the way full.  Bake at 350* for 15 minutes. 


They should look like this when they're done.  These are totally adorable, and delicious just as they are. However, we are about to bump the adorableness up to an extreme level.  Just sayin'.  


So, let the muffins cool (I let mine cool overnight, but a couple hours should be fine).  Slice the rounded top off each muffin.  Make the cream cheese glaze by mixing together the cream cheese, milk and honey.  Stir in some red and yellow food coloring to make it orange.  Put the flat sides of each muffin together so that they look like little tiny, tiny pumpkins.  Take some caramel and form them into little stems and leaves.  Drizzle some of the glaze on the top of each little pumpkin, then put a stem and two leaves on top of each.     


I use this recipe to make pumpkin bread ALL the time (just bake it for 50 minutes if you're making a loaf instead of mufins) and it's always a big hit.  Usually I double it and eat one loaf right away and slice up the other one and freeze each piece individually.  I don't generally make any type of glaze or icing either, and it tastes just as delicious without it.  I hope you that when you make these you enjoy them as much as I did.    

Happy Fall Y'all!