Showing posts with label mini mondays. Show all posts

Monday, March 4, 2013

Mini Mondays: Mini Jello Poke Cakes

Jello poke cakes are the perfect light dessert for spring and summer.  These little bundt cakes are even lighter because they are made with just cake mix and a can of sprite zero.  This is a tried and true Weight Watchers recipe where you take a box of cake mix and mix it with a can of diet soda (whatever kind you want).  Generally if you're making a darker cake (like chocolate) you want to use a darker diet soda (like diet coke).  I was skeptical about this at first because it sounds pretty crazy, but it totally works.  These little cakes have a slightly gummier texture than if you made them the traditional way (with eggs and oil), and if you're making these as cupcakes or a cake (as opposed to the mini bundt cakes) you'll want to cook them for 2-3 minutes longer than what it says on the box.  

The best part about these cute little cakes?  They clock in at just 2 Weight Watchers points plus!  Of course, that doesn't mean you can eat the entire batch, but you can feel less guilty about indulging in 1 or 2 when you're craving something sweet.

Mini Jello Poke Cakes


What you need:
1 box cake mix (I used white)
1 can Sprite Zero (or another diet lemon lime soda)
1 package jello (I used strawberry)
1 cup boiling water
1/2 cup cold water
Fat free cool whip


What you do:

Preheat the oven to 350*.  Mix the cake mix with the can of Sprite Zero.  If you're making mini bundt cakes you'll bake them for 18 minutes.  If you're making cupcakes or a regular cake add 3 minutes to the recommended cooking time on the cake mix box.  Let them cook completely once you take them out of the oven.  Once they're cook make the jello.  Add the package of jello the boiling water and whisk until the jello is dissolved, then whisk in the cold water.  

Take a bamboo skewer or a fork to poke several holes into the flat side of each mini bundt cake (if you're making cupcakes or a cake just poke holes on the top).  Then spoon some jello over each cake.  Refrigerate the cake for several hours.  Top each mini cake with one tablespoon of fat free Cool Whip.  


I took these to a little dinner party and no one could tell that they were "diet" cakes and neither could Cole or my brother.  I call that a success in my book.  I have a feeling these will be making many more appearances in my kitchen this year.  


Monday, February 4, 2013

Mini Monday: A Mini Valentine's Day

I don't know about you, but I think there's something so romantic about sharing dessert with someone you love.  And, for some reason sharing an Italian dessert is extra romantic.  Maybe because Italian is the language of love.  Maybe it's because you can pretend you're in Venice on a moonlit gondola ride.  Either way, Valentine's Day is the perfect time to make a delicious dessert that's just big enough to share with the one you love.  Plus, if you stay at home and make it yourself you don't have to deal with all the crowds at the fancy restaurants.  And if you feel like getting a little "romantic", well you're in the privacy of your own home.  Go right ahead.

If all of that sounds good to you, then you're going to love this recipe for tiramisu.  This recipe is for a full 9x11 pan of tiramisu, but for Valentine's Day making it into a heart shape big enough for two to share takes a delicious dessert and "kicks it up another notch," to borrow a phrase from Emeril.  

 Valentine's Day Tiramisu
(adapted from Jessica Lynn Writes)


What you need:
1 1/4 cup strongly brewed coffee (room temperature)
5 T Kahlua
Lady fingers (about 30)
3 egg yolks
1/3 cup sugar
1/8 tsp salt
1/2 T vanilla
16 oz marscapone
6 T cold heavy (whipping) cream
Cocoa
Cinnamon


What you do:

Mix coffee and 3 T Kahlua in a shallow bowl and set aside.  

In a large bowl, beat egg yolks at a low speed until just combined.  Add sugar and salt and beat at medium-high speed until it becomes pale yellow.  Next mix in the remaining 2 T Kahlua along with the vanilla.  Then add about two-thirds of the marscapone and mix until well combined and there are no lumps.  

Now, this is wear my version of the recipe differs.  The original recipe calls for raw eggs.  If I bought high-quality farm fresh eggs, I'd probably be fine with keeping the eggs raw but I buy my eggs from Walmart.  I'd rather be safe than sorry.  If you're fine with using raw eggs go ahead and feel free to skip this next step.  Anyway, transfer the egg and marscapone mixture to a glass bowl and cook over a double boiler.  Make sure you whisk the mixture the entire time, we're not trying to make scrambled eggs here.  The objective is to heat the mixture up enough to get the "rawness" off the eggs.  You'll know it's done with the mixture kind of "breaks" and thins out.  Once that happens, remove it from the heat and put it in the fridge to let it cool.  Once it's cool transfer it back to the mixing bowl and mix in the rest of the marscapone.  Once it's mixed smooth, transfer it back to the glass bowl.

If you're keeping the eggs raw, join back up with me here.  Pour the cream in the mixing bowl (don't worry about cleaning it out), and mix on high until it will hold stiff peaks.  Gently fold about 1/3 of the whipped cream into the marscapone mixture using a rubber spatula.  Then fold in the rest until there are no white streaks in the mixture.  

And now it's time to assemble the tiramisu.  Take a heart shaped cookie cutter and place it on a plate.  Take lady fingers one at the time and drop them in the coffee/kahlua mixture, quickly flip them over then remove from the coffee.  This whole process should take 2-3 seconds.  You don't want them soaked, just damped.  Place lady fingers in the cookie cutter in one layer, breaking up the lady fingers as necessary.  Next put a big scoop of the marscapone mixture on top of the lady fingers and spread it out.  Next sprinkle some cinnamon on top of the marscapone mixture, and then sift a layer of cocoa on top of that.  Put down another layer of lady fingers, then carefully remove the cookie cutter.  Next, put another layer of marscapone.  Top with some more cinnamon and a thick dusting of cocoa (enough to cover the whole top of the heart).  Cover and refrigerate for at least 6 hours.

If you want to make a pan of tiramisu, you basically do the same exact thing as above, except you lay the lady fingers in a layer on the bottom of the pan and build up from there.

Happy Valentine's Day


Monday, January 7, 2013

Mini Mondays: Mini Peach and Blackberry Cobbler

When I was growing up we had a few blackberry bushes in our backyard that produced the biggest, most delicious blackberries I've ever had.  We would have fresh blackberries all summer, and then we'd have enough to freeze and enjoy them for the rest of year until summer rolled around again.  The first summer we had the blackberry bushes my mom made what has become one of my favorite desserts; blackberry cobbler.  Her cobbler is actually more of a crisp (oatmeal, flour, brown sugar and butter topping) although I didn't find this out until I was in college and I took a food and culture class for the honors program.  For part of the class we had to split up into groups and each group cooked dinner for the entire class one night and we all got comment cards to "critique" the food.  When it was my group's turn to make dinner I made my mom's blackberry cobbler.  When I got the comments back from the professor there were a lot of "This is good, but it's not a cobbler."  Well.... okay, sue me.  That's what we call cobbler in my family. We're not from the south; cobbler is a fruit dessert with a sweet topping.  

Oh well, lesson learned.  I still love my mom's "cobbler" and that's my go to summer dessert.  But that's not what we're here to talk about today (but don't worry, we will talk about it one day).  This is recipe is for "real" cobbler.  These are perfectly portioned in single servings but good luck trying to stop at one.  You could make this with any kind of fruit you want.  I made some with blackberries, some with peaches and then I went a little crazy and made some with both because I think peaches and blackberries go together like peas and carrots.  

Mini Peach and Blackberry Cobbler


What you need:
1 cup sugar
1 cup flour
2 tsp baking powder
Dash of salt
3/4 cup milk
1 tsp vanilla
Brown sugar
Cinnamon
1/2 stick melted butter
Diced peaches
Blackberries (fresh or frozen, just make sure they're thawed)

What you do:


Sprinkle some cinnamon over the fruit and set aside and preheat your oven to 350*.  Meanwhile mix together the sugar, flour, baking powder, salt and milk.  Add in the vanilla and about 1 tsp of cinnamon.


Put one teaspoon of melted butter in the bottom of each muffin tin.  I made half with muffin liners and half without and they both turned out great.  If you need to transport these somewhere I would definitely suggest using the muffin liners though.  Then spoon in two tablespoons of the batter on top of the melted butter. 


Next, put some fruit in top of the batter.  I put 4-5 diced peaches or 3-4 blackberries in each tin.


Sprinkle some brown sugar and cinnamon on top of the fruit.  Bake for 20 minutes.  


Let the cobbler that isn't in the muffin liners cool almost completely in the pan before removing them.  Before you take them out run a knife along the edge to loose them then use a spoon to help lift them out of the pan. 


Of course, a cobbler isn't really a cobbler without a scoop of vanilla ice cream on top to go with it. 


I think you're technically supposed to serve cobbler with the fruit on the bottom, but I think it looked so much prettier with the fruit on the top so you could really see the colors. 


Sunday, December 2, 2012

Mini Mondays: Lasagna Cups

This month, for Mini Mondays I wanted to make something that would be easy to take to all those holiday parties you know you'll be going to (or having) in the next month.  These little lasagna cups are simple to make, and would be a great appetizer or a tasty addition to an hors d'oeuvre party.  You can make these in the foil muffin liners or directly in the muffin tin itself, they will stay together surprisingly well.  If you're making these for a party I'd suggest making them in the muffin liner because they're easier to serve and eat without a table that way. Plus, it makes for easier clean up.  This recipe will make enough for 12 lasagna cups. 

Lasagna Cups


What you need:
6 Lasagna noodles
8 oz ricotta cheese
Mozzarella cheese (finely shredded)
Parmesan cheese
Marinara sauce
Pepperoni
Basil (fresh or the Gourmet Gardens Basil Paste found in the produce section at the grocery store)

What you do:


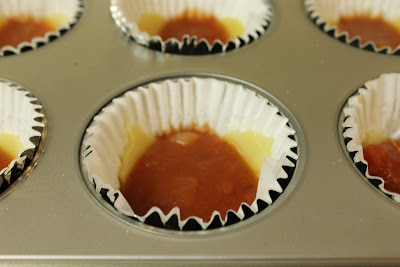
Cook the pasta to al dente.  Drain them and allow them to cool a bit until you can comfortably handle them.  Use whatever small shaped cookie cutter you have to cut the noodles (or cut them into squares small enough to fit in the muffin tin).  I couldn't find my little circle cookie cutter so I used a little heart one and it worked perfectly.  With this size cookie cutter I was able to get 4 hearts out of each noodle.  Put one noddle at the bottom of each tin.  


Put a little spoonful of marinara sauce on top of each noodle.  


Next put a couple slices of pepperoni.  


Mix some basil in with the ricotta cheese.  Put a small spoonful on top of the pepperoni and a little sprinkle of mozzarella cheese.


Next comes another layer of pasta.


And another layer of marinara.


And some more ricotta.  


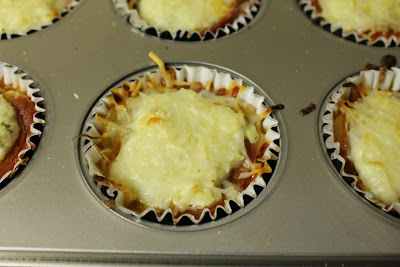
Now add some more mozzarella.  Put quite a bit because this is the top layer.  Top it off with a little bit of parmesan.  


Bake at 350* for 30 minutes, until the cheese is nice and melty.


Looks good, right? 


Monday, November 5, 2012

Mini Mondays: A Mini Thanksgiving

Thanksgiving is my absolute favorite holiday.  I could probably eat it once a month and never get tired of it.  My family's Thanksgiving is really special because my dad cooks the turkey on a charcoal grill so it doesn't taste like the typical oven roasted turkey (not that there's anything wrong with that).  The flavor that the turkey gets is so amazing, and it's always moist and delicious.  I have become very spoiled by my family's Thanksgiving.  So much so that the one and only year we ever had Thanksgiving at another family's house I was so disappointed and complained so much that the next weekend we had "real" Thanksgiving at our house.  Yes, I know... I'm spoiled.  I even had "Thanksgiving" dinner for my birthday this year.

Also, on our first date, Cole and I talked about Thanksgiving dinner for probably an hour.  The fact that  he asked me out after that is kind of a miracle, right?  I'm just glad I found someone who not only tolerates all of my weird quirks, but actually shares many of them with me.  I am one lucky girl.

So in honor of Thanksgiving, I decided to make a small version for this month's Mini Mondays.  This is something you could make any weekend of the year and get that little Thanksgiving fix.


Mini Thanksgiving


What you need:
Whole chicken
1 bag Pepperidge Farm Herb Seasoned Stuffing (I use the blue bag that has a mixture of white and wheat bread because that's what my mom always uses)
Chicken stock
1 bottle white zinfadel wine
1 yellow onion (diced)
5-6 cloves garlic finely chopped
5 stalks celery, cut into about 1/2 inch half circles
1 lb breakfast sausage
4 T butter
2 cans green beans
1 can cream of mushroom soup (I use reduced fat)
Milk
French's French Fried Onions
Potatoes
Cornstarch
Vegetable oil
Poultry seasoning
Thyme
Salt
Pepper

What you do:


Stuffing
Heat 2 T of butter in a large sauce pan.  Saute the garlic, onion and celery until they are soft.  Mix with the stuffing in a large bowl.  Cook the sausage and mix that in with the stuffing as well.  Add in about 3/4 cup of the wine and mix that in.  Then, add in enough chicken stock to make the mixture moist.  You'll use some of this to stuff the chicken, and the rest will cook in the oven in a glass baking dish, covered, at 350* for 30 minutes.

Mmm stuffing.  Although, apparently this is dressing because this wasn't stuffed into the chicken.  Whatever, I call it stuffing anyway and all these southern people I'm surrounded by can look at me weird.  

Roast chicken
Clean the chicken (remove the gizzards, wash off the inside and outside of the chicken and pat it dry).  Rub with a couple tablespoons of vegetable oil.  Season with salt, pepper and poultry seasoning.  Stuff the cavity with the stuffing/dressing.  Add wine into a large baking dish (enough so that there's 2-3 inches of wine in the bottom of the dish).  Add poultry seasoning and thyme to the wine (about 3 T poultry seasoning and 1 T thyme).  Just make sure that the wine is completely covered with a layer of seasoning.  Place a roasting rack in the baking dish and put the chicken on top.  Cook for 1 1/2 to 2 hours at 350*.  Cook uncovered for a nice crispy skin.

As a note, the chicken will take longer to cook than a regular roast chicken because it's stuffed.

Gravy
Take the drippings from the chicken (that are now mixed with the wine) and pour into a small saucepan.  Add about 1/2 cup chicken stock and cook over medium-high heat until it comes to a boil.  Mix 1 T cornstarch with about 1/2 cup milk and slowly whisk in to the gravy.  Continue to cook the gravy until it has thickened up.

Green Bean Casserole 

Mix the cream of mushroom soup and 3/4 cup milk in a baking dish.  Season with pepper.  Drain the green beans and mix with in with the soup, then stir in about 1/2 cup french fried onions.  Cook uncovered at 350* for 25 minutes, top with about 1/2 cup french fried onions and cook for another 5 minutes.

Mashed Potatoes


Peel and chop 4 medium sized potatoes.  Cover in water and cook over medium heat until the potatoes are soft.  Drain the potatoes and return to the pot.  Add 2 T butter and some milk and whip the potatoes with a handheld mixer.  Add a little amount of milk at first, then slowly add more until your potatoes are at the perfect fluffy consistency.  Season with a little bit of salt.


When I made this, as soon as I took the chicken out of the oven I put the stuffing and green bean casserole in.  The chicken needs to sit for at least 20 minutes before you cut into it anyway to let all the juices settle, otherwise you'll have a really dry chicken (and no one wants that).  I had the potatoes done (but not drained) and sitting on low heat so that I could quickly whip them up when the stuffing and green bean casserole had about 10 minutes left in the oven.  I also put the crescent rolls in the oven  when there was about 13 minutes left for the stuffing and casserole (because that's how long the rolls take to cook).

I will now be cooking my mini version of Thanksgiving dinner probably once a month.  My name is Jennifer, and I have a problem.  Do you think they have a Thanksgiving Addicts Anonymous support group?

Monday, October 1, 2012

Mini Mondays Fall Edition: Pumpkin Bread

Fall is my favorite time of year.  Cool weather, sweaters, boots, football, apples and pumpkin everything: pumpkin pasta, pumpkin candles, pumpkin bread, pumpkin spice lattes. I love it all.  

This is just for the lolz.  


The thought of fall is the only thing that gets me through the miserable summer months in Texas.  Even though in Texas fall really means 80 degree weather, which is still hot to really be fall, it's still better than 100 plus degrees every day so I'll take what I can get.  So in honor of the first Mini Monday of Fall, I present to you mini pumpkin muffins. 


Mini Pumpkin Muffins


What you need:

Pumpkin Muffins
2/3 cup canned pumpkin
1 egg
1/3 cup vegetable oil
1/4 cup water
1 cup sugar
1 1/4 cup flour
3/4 tsp baking soda
1/2 tsp salt
1/4 tsp cinnamon
1/4 tsp ground nutmeg
1/8 tsp ground cloves
1/8 tsp ground ginger
Mini bundt pan (If you don't have one you can use a muffin pan, they just won't look like little pumpkins when they're done.)
Caramel

Cream Cheese Glaze
4 oz cream cheese
2 T honey
2 T milk

What you do:


Mix together the wet ingredients: pumpkin, vegetable oil, water and sugar.  


Add in the dry ingredients and mix well.  Fill the mini bundt pans about 2/3 of the way full.  Bake at 350* for 15 minutes. 


They should look like this when they're done.  These are totally adorable, and delicious just as they are. However, we are about to bump the adorableness up to an extreme level.  Just sayin'.  


So, let the muffins cool (I let mine cool overnight, but a couple hours should be fine).  Slice the rounded top off each muffin.  Make the cream cheese glaze by mixing together the cream cheese, milk and honey.  Stir in some red and yellow food coloring to make it orange.  Put the flat sides of each muffin together so that they look like little tiny, tiny pumpkins.  Take some caramel and form them into little stems and leaves.  Drizzle some of the glaze on the top of each little pumpkin, then put a stem and two leaves on top of each.     


I use this recipe to make pumpkin bread ALL the time (just bake it for 50 minutes if you're making a loaf instead of mufins) and it's always a big hit.  Usually I double it and eat one loaf right away and slice up the other one and freeze each piece individually.  I don't generally make any type of glaze or icing either, and it tastes just as delicious without it.  I hope you that when you make these you enjoy them as much as I did.    

Happy Fall Y'all! 


Monday, September 3, 2012

Mini Mondays Gameday Edition: Calzones

In honor of the first Mini Monday of "Football Season" (which really is a season around here) I wanted  to make something that would be perfect to snack on while watching the game.  No forks or knives required.  So I thought about it, and decided calzones (or as Cole calls them: cal-zone-ays) were the winning the idea.  Making them mini is perfect because you can make a bunch different kinds, you don't have to decide on just one kind like you do when you make pizza.

Mini Calzones


What you need:
Pizza dough (click here for a recipe)
Whatever toppings your little heart desires
Small container of ricotta cheese
1/2 cup approx. shredded mozzarella cheese
2 eggs
Marinara sauce

What you do:


Prepare pizza dough.  Preheat oven to 400*.  Chop up whatever toppings you want for you calzones.  I used sausage, bacon, jalapenos, onion, bell pepper, pineapple and ham.  I was so excited for these because I got Hawaiian calzones.  We don't really make Hawaiian pizza because Cole doesn't like it, but this way I got to make my own little mini Hawaiian calzones! 


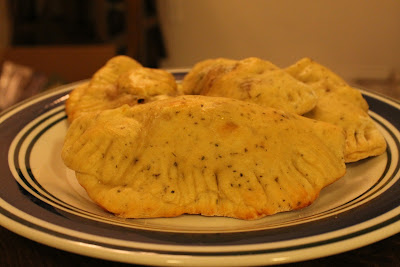
Mix ricotta cheese, mozzarella cheese and one egg together.  Take a golfball size piece of dough and roll it out pretty thin.  Put a small scoop of the cheese mixture in the middle, then add whatever toppings you want.  Fold the dough over so you have a little half circle shape.  Press the edges closed with a fork and brush eggwash over the top of the calzone.  Bake for 15 minutes, until crust is golden brown.  Serve with marinara sauce for dipping.   


Monday, July 2, 2012

Mini Mondays- Mini Meatloaf

Oh my gosh, blogger fail.  Not only have I been horrible at posting at all lately (something which Cole points out on a regular basis), but I'm just not getting around to posting Mini Mondays with only 2 hours left in the day.  I hope y'all can forgive me.

Anyway, when I was thinking about what I could for Mini Mondays this month, I was really at a loss.  So I was thinking, and thinking, and thinking and I finally came up with a stroke of genius.  I'm know, I know, I'm totally modest, right?  Well, my stroke of genius was mini meatloaf!  I can't take any credit for this really; Cole's mom used to make meatloaf this way.  I'll admit when he first suggested baking meatloaf in a bell pepper I was pretty skeptical.  I have had one experience with stuff bell peppers in my life, and let's just say it was not a good one (think mushy rice filling and even mushier peppers; yuck).  These are nothing like that.  The peppers stay nice crisp and are the perfect vessel for the meatloaf.

Mini Meatloaf


What you need:
1 lb ground beet
4 whole bell peppers
1/2 cup oatmeal
1 egg
1 small yellow or white onion, diced
4-5 cloves garlic, finely chopped
2-3 tsp. Salt
3 tsp. Pepper
1 T Garlic powder
1 T Cayenne pepper
1/2 T Chili powder
1/2 T Thyme
3 T Ketchup
2 T yellow mustard
1 1/2 T dijon mustard


What you do:


Preheat oven to 350*
Cut the bell peppers in half and remove the seeds and core inside.  Then saute the onion and garlic until the onions are barely translucent.  I like mine with still a little bit of bite, but if you want them really soft go ahead and knock yourself out.  Then mix the hamburger together with the onions, garlic, and the rest of the listed ingredients.  The amounts listed are more of guidelines, season the meatloaf to your taste (or if you have your own recipe, by all means use that).  A good way to test if you've seasoned it enough is to take a little piece and cook it on the stove real quick.  There is nothing worse than underseasoned meatloaf (believe me, I made that mistake last time I made this).  Divide the meatloaf into equal sized portions and stuff it in each pepper half.  Bake for 30 minutes.  I served mine with mashed potatoes and salad.  Next time I think I'll make it with mashed potatoes and corn because that's what I always had with meatloaf growing up (and plus it's corn season, and I'd eat corn on the cob 3 times a day if I could).
  

Look how cute these are!  And they are the perfect serving size.  I usually eat 1-2, Cole will eat 3 and then I'll have a few to take to work for lunch for the next few days.